
You will see more symbols when you click on the small grey arrow below the visible symbol bar.

That is what the new symbols look like:

You can find information about the symbols of the expanded left symbol bar in the chapter Expansion of the left symbol bar.
In the following the features of the individual symbols will be explained:
Once you clicked on the  symbol you can move elements in the display window.
Text element
You can find out how to insert and edit a text or rich text element in the sub chapter Text element.
Check box
You can also insert a check box. Select the  symbol and then create the check box in the display window by pull it open.
Picture element
You can read about how to insert and edit a picture element in the sub chapter Picture element.
Frame element
With the left symbol you also have the possibility to insert a frame. Click on the  symbol and then pull up your frame in the display window.
Table
You can also create a table with the  symbol. Select it in the symbol bar and then pull it up in the display window.
If you select a single row a blue arrow will appear in the upper right corner. When you click on it the following window appears:
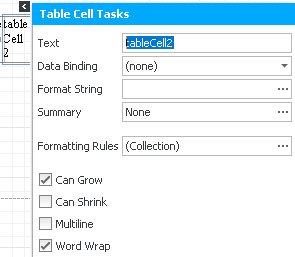
For text you enter the text that should appear in this cell. If you want to you can enter a format string or a summary as a text. For the summary you click on the three dots ... behind sum and a window will open. You can read about those settings in the sub chapter Fields from the data explorer in Field tab.
The formatting rules can be set like for the picture element. Now you choose if a cell should be able to grow or shrink, if it could be multiline or if there should be word wraps.
By right clicking on the single cells of the table the following list appears:
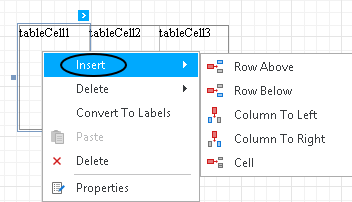
Go on Insert and then choose if you want to insert a row or a column above or below the current one or if you only want to insert one cell.
More settings can be found in the chapter Property Grid.
Lines
Another symbol is the following:  . With it you can insert lines into your document. Pull up your line in the display window and click on the blue arrow in the upper right corner. You will now see this dialog:
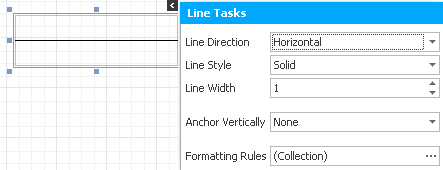
Here you can set the line direction, the line style and the line width. If you want to you can create formatting rules again. More settings can be found in the chapter Property Grid.
Shape
With the symbol  you can insert a shape. Click on it and then pull up the shape in the display window. In order to rotate the shape go on Ctrl and move the mouse while pressing the left mouse key. Again, there is the possibility to open a properties menu by clicking on the blue arrow:
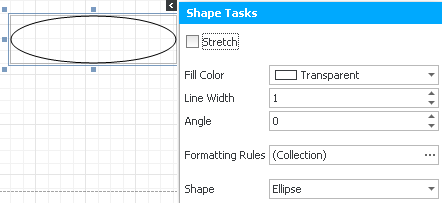
If you tick Stretch the size of the figure will adjust to the border automatically. Next, you enter the fill color, the line width and the angle how far the figure should be rotated. You can also set formatting rules. There are several kinds of shapes you can choose from, like ellipse, rectangle or arrow. More settings can be found in the Property Grid.
Bar code
In order to insert a bar code click on the  symbol. Then you pull up the barcode in the display window. Click on the blue button with the arrow and the following list will open:
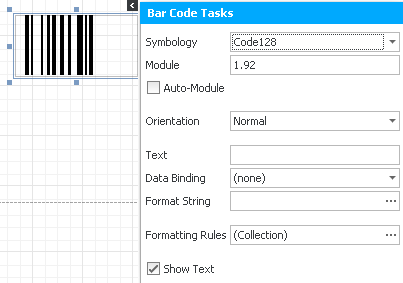
For symbology you choose the kind of bar code you want. You can find out more about the different kinds of bar codes in the chapter Field Tab of the simple report designer. With module you regulate the width and if you tick Auto-Module the width of the barcode will be adjusted automatically to the frame. If you want to rotate your bar code choose an option from Orientation. You have the possibility to insert a text with the bar code as well. You can either connect it to a certain data record (data binding) and define it with the format string or enter it on its own (Text). Add a bookmark or formatting rules if you want to. You do not tick the last option if you do not want to show the text. Further settings are explained in the chapter Property Grid.
