After configuring the interface to Microsoft Teams, you can now create a Teams meeting from Act! calendar.
Below you will learn how to create a Microsoft Teams meeting from Act! CRM system.
1. Open your Act! calendar and click twice on an empty field. This window will open.
Below the picture you will find the explanation of each name.
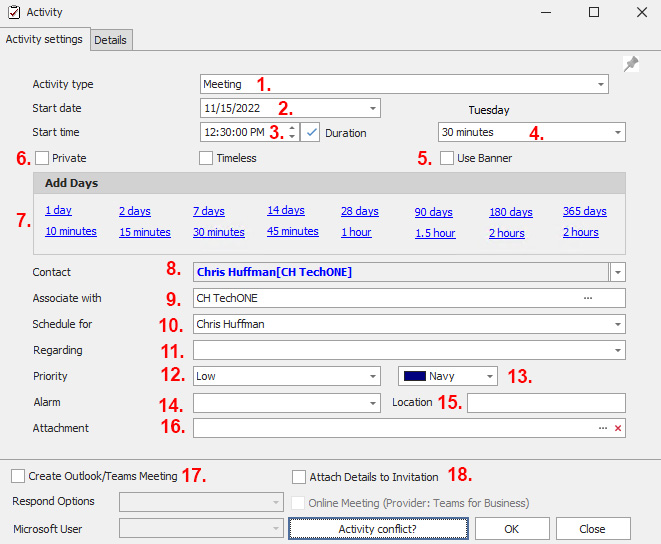
1. Activity type: Here you can choose which type of appointment it is.
2. Start date: Select a date here when the meeting should take place.
3. Start time: Enter here the start time at which the meeting should take place. (If you don't have a specific start time you can check  here).
4. duration: Here you can choose how long the meeting should take place.
5. Use banner: Once you have created your meeting, you can have your meeting show up in the Act! calendar at the top of the calendar.
6. Private: Check this box if the meeting is private. (Nobody but you can see the content of your meeting).
7. Add Days: without setting a start date, you have 13 defaults to choose from here.
8. Contact: Select here the contact you want to make a meeting with. If you click here on this icon  next to the contact field. On the right side of the field this window will open, here you can select how you want to add the contact. Whether you want to select the contact or multiple contacts from your Act! database
  , If you want to add a new contact click
  , You can also add your own record by clicking on
  if you have already selected a contact, click
  .
.
9. Associate with: If you click on the three dots here on the right side, you can link the contact to a group, company or opportunity.
10. Schedule for: In this field you can select for which record you want to schedule this meeting.
11. Regarding: Here you can enter a subject that will be included in the invitation.
12. Priority: Decide if the priority of the meeting is  ,
, or
or  .
.
13. you can choose a color for your meeting, which will be displayed in the Act! calendar in that color.
14. Alarm: set an alarm so that you know before the meeting when the meeting will start.
15. Location: Type in a location where you want the meeting to take place.
16. Attachment: You can also set an attachment to your meeting.
17. Create outlook/teams meeting: If you put a check here, the options below will be grayed out for you. If you do not check here, no Outlook/Teams meeting will be created for you.
18. Attach Details to invitation: By placing a check mark, the details from the meeting will be added as well.
If you have set a check mark as described at 17. these options will be grayed out for you:
Response options:

Here you can check  if you want to select both options. If you check
  , the contact will be able to reply to you. With this button
  the contact can select the following options:
  ,
,  or
or  .
.
If you want the contact to give suggestions for meeting time, you can check here  .
.
Microsoft users:

Select the Microsoft Teams user you created here.
Online meeting (Provider: Teams for Business)

Check this box to send it to the contact automatically after clicking the  button (bottom right).
|
In the Advanced edition, you can use only one Teams account in Act! With Professional Edition, you can use multiple Teams accounts in Act!
|

